Thursday, November 29, 2012

Free Movie Subtitler : Hard Code An External Subtitle File Into A Video File

သင့္ ကြန္ျပဴတာမွာ Movie ေတြၾကည့္တဲ့အခါ subtitle မပါခဲ့ ရင္ အြန္လိုင္းကေန ေဒါင္းလုပ္လုပ္ျပီးၾကည့္ရပါတယ္။Video player က သင္ေဒါင္းလုပ္လုပ္ထားတဲ့ subtitle ကို support မလုပ္လို ့ဘဲျဖစ္ျဖစ္၊သင့္ movie ဖိုင္မွာ subtitle ကိုအေသထိုးထားခ်င္လို ့ဘဲျဖစ္ျဖစ္ ဒီလို အေျခေနမ်ိဳးမွာ free movie subtitler ဆိုတဲ့ tool ေလးက အသံုး၀င္ပါတယ္။Avi,mpeg အပါအ၀င္တစ္ျခား video format ေတြကို support ေပးျပီး ၊ subtitle format ေတြအေနနဲ ့ .sub,  .srt ႏွစ္မ်ိဳး ကို support ေပးပါတယ္။

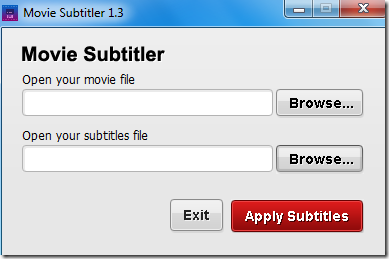
Movie subtitler ကို run ျပီးရင္ video ဖိုင္နဲ ့ subtitle ဖိုင္ကိုေရြးေပးျပီး Apply Subtitles ကိုႏွိပ္ပါ။

1

Video ဖိုင္ဆို္က္ေပၚမူတည္ျပီးအခ်ိန္္ၾကာျမင့္ပါလိမ့္မယ္။ျပီးရင္ေတာ့ subtitle အေသထိုးထားတဲ့ video ကိုရရွိပါျပီ။

Download Free Movie Subtitler @ www.convertibleinc.com/free-movie-subtitler.php

Windows 8 Upgrade Assistant

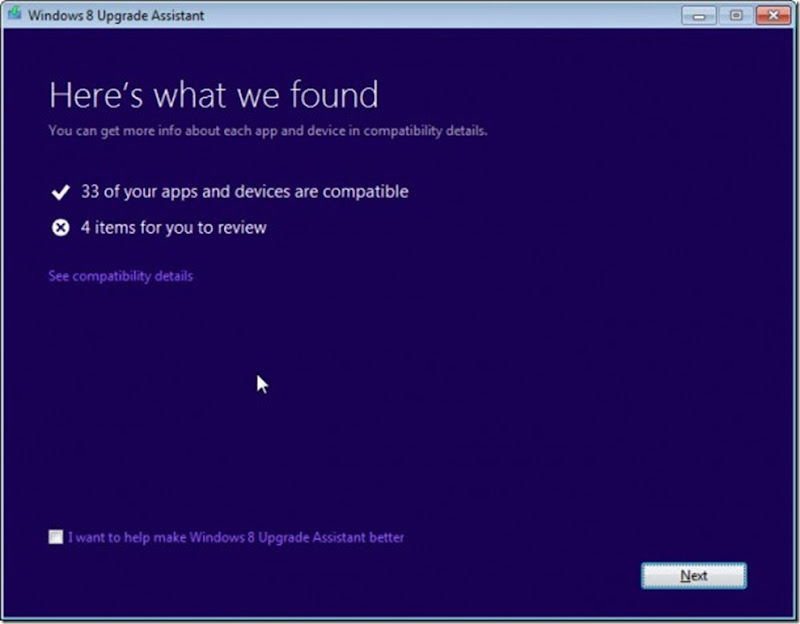
သင့္ကြန္ျပဴတာမွာ windows 8 ကို install မလုပ္ခင္မွာသင့္ကြန္ျပဴတာရဲ ့ hardware,applications အျပင္ ကြန္ျပဴတာနဲ ့တြဲဖက္အသံုးျပဳေနတဲ ့printers,scanners,peripheral devices ေတြဟာ windows 8 နဲ ့ compatible ျဖစ္မျဖစ္ သိရွိႏိုင္ေအာင္ျပဳလုပ္ေပးမယ့္ microsoft ရဲ  ့ windows 8 upgrade assistant ပါ။ဒီ application ကို မ run ခင္မွာသင့္ ရဲ့ ့ printer,scanner စတဲ့ peripheral devices ေတြကို ခ်ိတ္ဆက္ထားဖို ့လိုပါတယ္။

Windows 8 upgrade assistant ကို run ရင္ scan လုပ္ပါလိမ့္မယ္။အခ်ိန္အနည္းငယ္ၾကာျပီးရင္ ေတာ့ compatibility report ကို ရရွိပါလိမ့္မယ္။

1

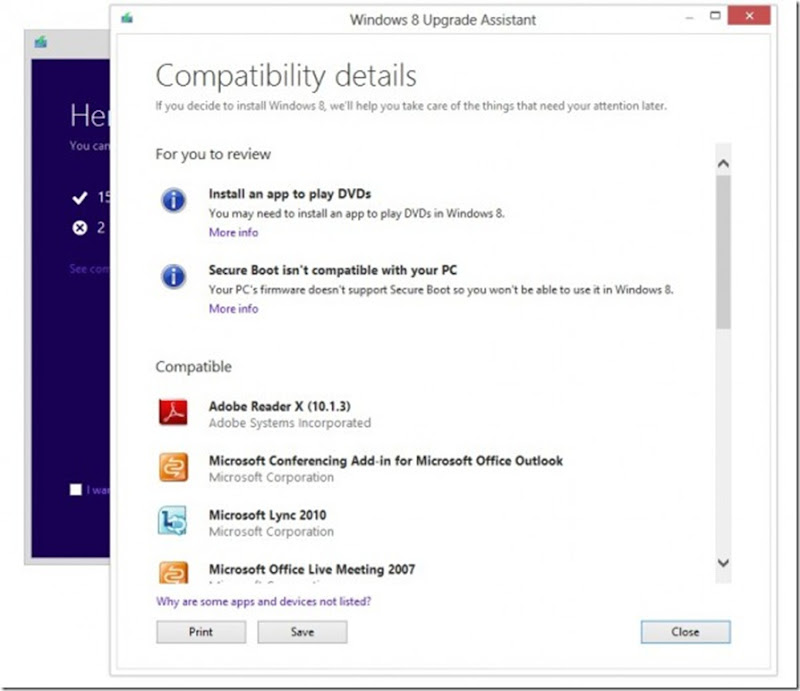
See compatibility details ကိုႏွိပ္ၾကည့္ရင္ compatible ျဖစ္တဲ့ applications ေတြ compatible မျဖစ္တဲ့ applications,items ေတြကို ျမင္ေတြ ့ႏိုင္ပါတယ္။

2

Windows 8 အတြက္ လိုအပ္တဲ့ system requirements ေတြကို microsoft website ကထုတ္ျပန္ထားတာကေတာ့

Processor: 1 gigahertz (GHz) or faster with support for PAE, NX, and SSE2 (more info)

RAM: 1 gigabyte (GB) (32-bit) or 2 GB (64-bit)

Hard disk space: 16 GB (32-bit) or 20 GB (64-bit)

Graphics card: Microsoft DirectX 9 graphics device with WDDM driver

ဒီထက္ပိုျပီးအေသးစိတ္ဖတ္ရွုၾကည့္ခ်င္ရင္ေတာ့ system requirement page မွာဖတ္ပါ။

Download windows 8 upgrade assistant @ http://windows.microsoft.com/en-US/windows-8/upgrade-to-windows-8#section_5

Wednesday, November 28, 2012

How To Download Torrent Without Torrent Client

အရင္ေဆာင္းပါးတစ္ခုမွာ What is torrent file ? and how to download it ဆိုတာေရးေပးခဲ့ပါတယ္။Torrent transfer ကိုတစ္ခ်ိဳ ့ ISP ေတြက throte(slow down) လုပ္ထားတဲ့အတြက္ ေဒါင္းလုပ္လုပ္ရတာၾကာတတ္ပါတယ္။ေနာက္ျပီး ကြ်န္ေတာ္တုိ ့ရဲ ့ကြန္နက္ရွင္ေႏွးျခင္း၊share ratio(seeder-leecher ratio) ေတြအေပၚမူတည္ျပီး ေဒါင္းလုပ္လုပ္ရတာၾကာတတ္ပါတယ္။အခုေတာ့ torrent ဖိုင္ေတြကို ေဒါင္းလုပ္ဆြဲေပးႏိုင္တဲ့ online bittorrent client ေတြအျဖစ္ျပဳလုပ္ေပးႏိုင္တဲ့ free web service ေတြေပၚလာပါျပီ။အဲဒီ web service ေတြကို torrent ဖိုင္ေတြကို အရင္ေဒါင္းလုပ္ဆြဲခိိုင္းျပီး မွ ရလာတဲ့ဖိုင္ကို ကြ်န္ေတာ္တို ့ၾကိဳက္ႏွစ္သက္ရာ Download Managers ေတြနဲ ့ေဒါင္းလုပ္လုပ္ႏိုင္ပါျပီ။

ZBIGZ

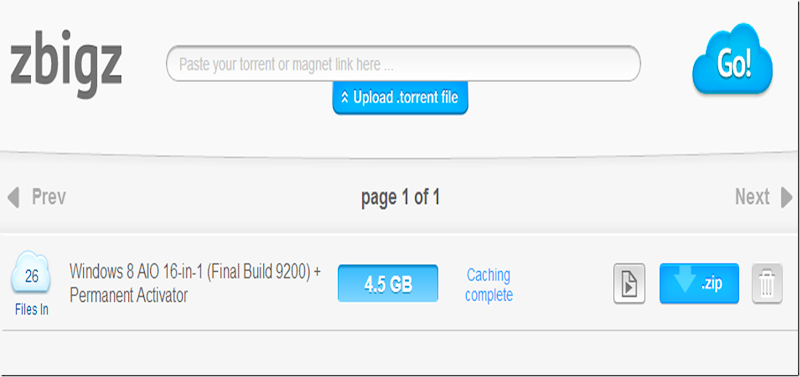
zbigz ဆိုက္မွာ free account တစ္ခုလုပ္ျပီးရင္ Upload .torrent file ကိုႏွိပ္ျပီး သင့္ရဲ ့ torrent (.torrent) ဖိုင္ကို upload လုပ္ေပးပါ။ေနာက္တစ္နည္းက torrent ကို upload လုပ္စရာမလိုဘဲ torrent site က  torrent or magnet link ကို copy and paste လုပ္ပါ။ ျပီးရင္ Go ကိုႏွိပ္ျပီးေနာက္ page တစ္ခုေပၚလာရင္ free ကိုႏွိပ္ပါ။ဒါဆိုရင္ သင့္ torrent ဖိုင္ကို ေဒါင္းလုပ္စဆြဲေပးပါလိမ့္မယ္။

1

သင့္ torrent ဖိုင္ရဲ ့ share ratio(seeder-leecher ratio),file size အေပၚမူတည္ျပီးအခ်ိန္ၾကာျမင့္ပါလိမ့္မယ္။Caching complete ျဖစ္သြားရင္ေတာ့ သင့္စိတ္ၾကိဳက္ေဒါင္းလုပ္မန္ေနဂ်ာ နဲ ့ ေဒါင္းလုပ္လုပ္ႏိုင္ပါျပီ။Free user အေနနဲ ့ ဖိုင္ႏွစ္ခု သိမ္းထားႏိုင္ျပီး max file size ကို 8 gb သတ္မွတ္ထားပါတယ္။ဖိုင္ေတြကို ၇ ရက္ၾကာသိမ္းေပးထားျပီး ၇ ရက္အတြင္းမွာေဒါင္းလုပ္လုပ္ႏိုင္ပါတယ္။Resume လုပ္လို ့ရတဲ့အတြက္အဆင္ေျပပါတယ္။

BOXOPUS

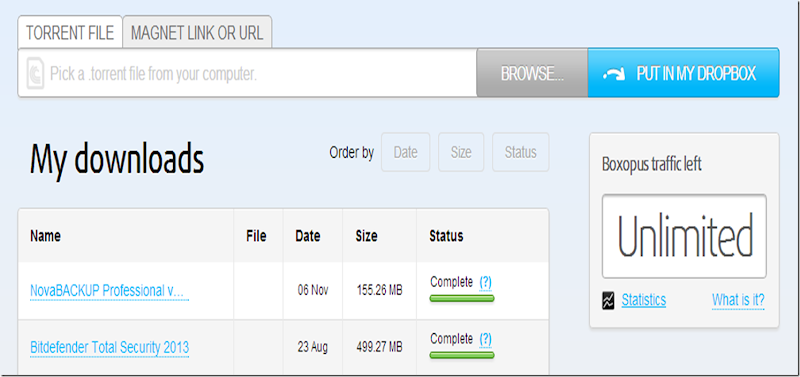
ေနာက္ free web service တစ္ခု က  boxopus ပါ။Boxopus ဆိုက္က စဖြင့္ဖြင့္ခ်င္းမွာ torrent ဖိုင္ေတြကိုေဒါင္းလုပ္လုပ္ေပးႏို္င္တဲ့အျပင္ သင့္ ရဲ ့ dropbox အေကာင့္ဆီကိုပါေဒါင္းလုပ္လုပ္ျပီးတဲ့ဖိုင္ေတြကို ပို ့ေပးႏိုင္ပါတယ္။ေနာက္ပိုင္မွာေတာ့ dropbox ကခြင့္မျပဳေတာ့တဲ့အတြက္ dropbox အေကာင့္ကို မပို ့ေပးႏိုင္ေတာ့ပါဘူး။ဒါေပမယ္ ့ေဒါင္းလုပ္လုပ္ထားတဲ့ ဖိုင္ေတြကို boxopus ကေန ၂၄ နာရီအတြင္းမွာ ေဒါင္းလုပ္လုပ္ႏိုင္ပါတယ္။Boxopus မွာ အေကာင့္တစ္ခုလုပ္ျပီးရင္ဒါမွမဟုတ္ facebook ,twitter အေကာင့္ေတြနဲ ့sign in လုပ္ျပီးရင္ သင့္ torrent(.torrent) ဖိုင္ကို upload လုပ္ပါ။ေနာက္တစ္နည္းက magnet link or url ကိုႏွိပ္ျပီး torrent ကို upload လုပ္စရာမလိုဘဲ torrent site က  torrent or magnet link ကို copy and paste လုပ္ပါ။  ျပီးရင္ put in my dropbox ကိုႏွိပ္ပါ။

3

ေနာက္ page တစ္ခုေပၚလာရင္ start download ကိုႏွိပ္ပါ။ဒါဆိုရင္ torrent ဖိုင္ ကို ေဒါင္းလုပ္စဆြဲပါျပီ။သင့္ torrent ဖိုင္ရဲ ့ share ratio(seeder-leecher ratio),file size အေပၚမူတည္ျပီးအခ်ိန္ၾကာျမင့္ပါလိမ့္မယ္။Status မွာ complete ျဖစ္သြားရင္ေတာ့ သင္ဖိုင္ကို ၾကိဳက္ႏွစ္သက္ရာ ေဒါင္းလုပ္မန္ေနဂ်ာနဲ ့ေဒါင္းလုပ္လုပ္ႏိုင္ပါျပီ။Max file size ကို 2 gb သတ္မွတ္ထားျပီး ၂၄ နာရီအတြင္းမွာေဒါင္းလုပ္လုပ္ႏိုင္ပါျပီ။

What Is Torrent File? And How To Download It

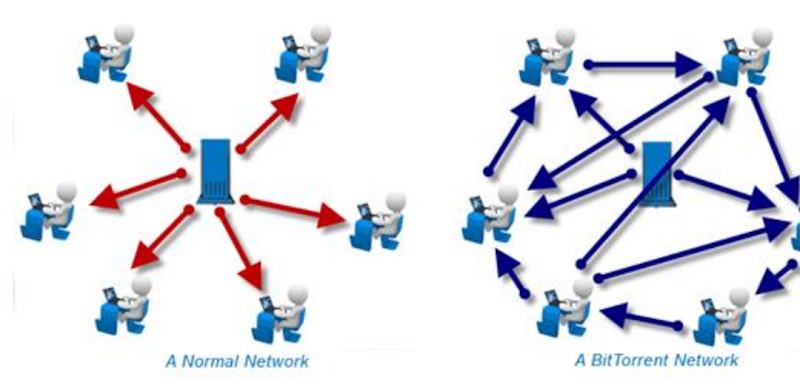
Internet မွာဖိုင္ေတြ ကို share လုပ္ဖို ့email, file hosting sites ေတြကို အသံုးျပဳၾကပါတယ္။BitTorrent ဆိုတာကေတာ့အဲဒီနည္းေတြနဲ ့မတူတဲ့ peer-to-peer file sharing (p2p) နည္းပညာတစ္ခုပါ။ဖိုင္ေတြကို အင္တာနက္ ေပၚ upload လုပ္ျပီး share လုပ္တာမဟုတ္ဘဲ ကြန္ျပဴတာေတြကေန အျခားကြန္ျပဴတာေတြဆီကို  တိုက္ရိုက္ share လုပ္ေပးပါတယ္။တစ္ျခားနည္းေတြလို server တစ္ခုတည္းကေနပဲေဒါင္းလုပ္လုပ္စရာမလိုဘဲ bittorrent network အတြင္းမွာ အျပန္အလွွန္ file ေတြ share လုပ္ေပးပါတယ္။

1

Torrent

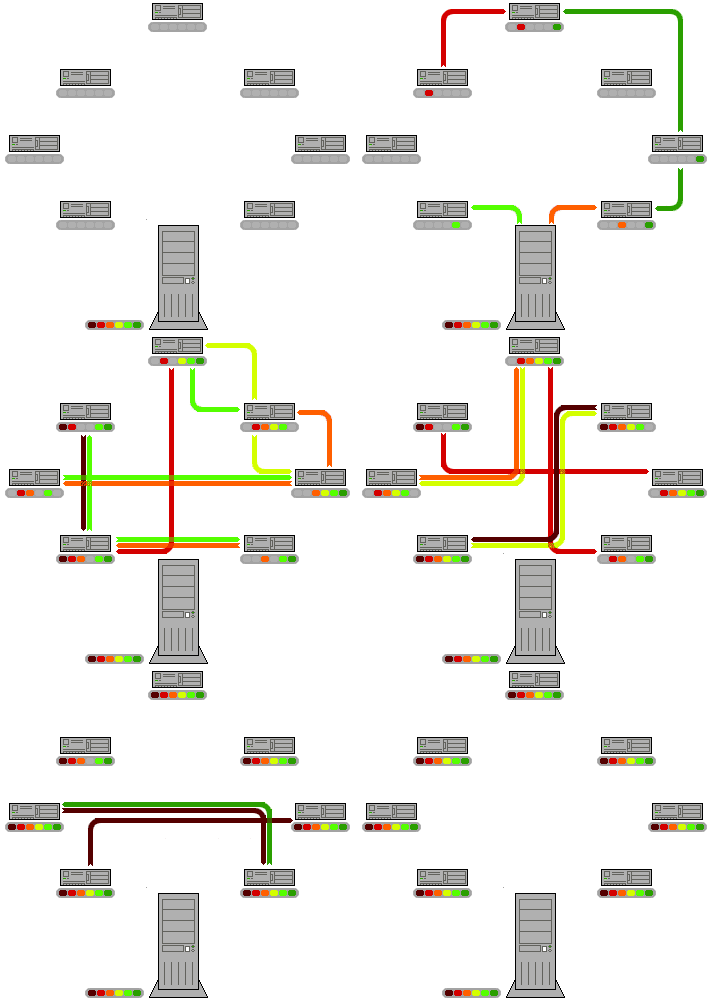
BitTorrent နည္းပညာ ကိုအသံုးျပဳဖို ့ torrent(.torrent) ဖိုင္ေတြကို ဖန္တီးျပီး အသံုးျပဳၾကရပါတယ္။Torrent ဖိုင္ေတြဟာဖိုင္ဆိုက္ေသးငယ္ျပီး ေျမပံုတစ္ခုနဲ ့တူျပီးဖိုင္ကို share လုပ္ထားတဲ့ကြန္ျပဴတာ ေတြရဲ ့သတင္းအခ်က္အလက္ေတြ ၊server url,file size စတာေတြကိုိုသိမ္းထားေပးပါတယ္။ေအာက္ကပံုမွာျမင္ေတြ ့ရတဲ့အတိုင္းပဲ bittorrent network ထဲက ကြန္ျပဴတာတစ္လံုးဟာတစ္ျခားကြန္ျပဴတာတစ္လံုးကေန ဖိုင္ရဲ  ့အစိတ္အပိုင္းဖိုင္တစ္ခုကို ရရွိႏိုင္ျပီး အဲဒီရရွိတဲ့ဖိုင္ကိုတစ္ျခား ကြန္ျပဴတာတစ္လံုးဆီကို ျပန္လည္ေ၀မွ်ေပးပါတယ္။သင္လို ခ်င္တဲ့ ဖုိင္တစ္ခုကို  ေဒါင္းလုပ္လုပ္ဖို ့  torrent(.torrent)ဖိုင္ကိုအရင္ေဒါင္းလုပ္လုပ္ရမွာျဖစ္ျပီး BitTorrent client ေတြကေန အဲဒီ torrent ဖိုင္ကို အသံုးျပဳျပီးသင္လိုခ်င္တဲ့ဖိုင္ကို ေဒါင္းလုပ္လုပ္ရမွာျဖစ္ပါတယ္။ Torrent sites အ  မ်ား ၾကီး ထဲ က မွ နာ မည္ ၾကီးတဲ့ဆိုက္တစ္ခ်ိဳ ့ကေတာ့ isohunt,extratorrent,demonoid,piratebay,kissass torrent စတာေတြျဖစ္ပါတယ္။ဒါ့အျပင္ torrent search engine ေတြသီးသန္ ့ရွိျပီး torrentz,torrent scan,fenopy စတဲ့ search engine ေတြကေနလည္း ရွာေဖြႏိုင္ပါတယ္။

torrent

BitTorrent Client

BitTorrent client ဆိုတာကေတာ့ torrent ဖိုင္ေတြကသတင္းအခ်က္အလက္ ေတြကို ဖတ္ျပီး ေဒါင္းလုပ္လုပ္ေပးႏိုင္တဲ့ ေဆာ့၀ဲပါ။BitTorrent client အမ်ားအျပားရွိျပီး အဲဒီထဲကမွ လူသံုးမ်ားတဲ့ uTorrent,deluge,vuze,bittorrent စတာေတြ ကိုအခမဲ့ ေဒါင္းလုပ္လုပ္ႏို္င္ပါတယ္။

Peer

Peer ဆိုတာကေတာ့ torrent ဖိုင္ကို download , upload လုပ္တဲ့ေနရာမွာပါ၀င္ေနတဲ့ကြန္ျပဴတာေတြပါ။

Seeder

Seeder(seed) ဆိုတာကေတာ့ torrent network ကေနျပီး ဖိုင္ကို ေဒါင္းလုပ္လုပ္ျပီးသူျဖစ္ျပီးျပန္လည္ upload လုပ္ေပးတဲ့သူျဖစ္ပါတယ္။ Torrent client ကေနေဒါင္းလုပ္လုပ္ျပီး တဲ့အခ်ိန္မွာ client ကိုမပိတ္ဘဲဒီအတိုင္းဆက္ဖြင့္ထားရင္အလိုလို upload လုပ္ေနမွာျဖစ္ပါတယ္။

Leecher

Leecher(leech) ကေတာ့ ေဒါင္းလုပ္လုပ္ေနဆဲသူျဖစ္ျပီးေဒါင္းလုပ္ျပီးစီးပါကျပန္လည္ upload မလုပ္ေပး သူျဖစ္ပါတယ္။Torrent client ကေနေဒါင္းလုပ္လုပ္ျပီး တဲ့အခ်ိန္မွာ client ကိုမပိတ္ဘဲဒီအတိုင္းဆက္ဖြင့္ထားရင္ အလိုလို upload လုပ္ေနမွာျဖစ္ျပီး seeder ျဖစ္လာမွာပါ။

Share Ratio

Torrent ဖိုင္ တစ္ခုကိုေဒါင္းလုပ္လုပ္မယ္ဆိုရင္ seeder-leecher ratio ကိုေလ့လာပါ။Seeder က leecher ထက္အေရအတြက္ပိုမ်ားတဲ့ဖိုင္ကိုေရြးခ်ယ္ေဒါင္းပါ။အဲဒါမွ သင့္ရဲ  ့ ေဒါင္းလုပ္ကျမန္ဆန္စြာျပီးစီးမွာျဖစ္ပါတယ္။

Tracker

Tracker ဆိုတာကေတာ့ seeder နဲ  ့ leecher ကို ေပါင္းကူေပးထားတဲ့ server တံတားတစ္ခုျဖစ္ျပီး ဘယ္ကြန္ျပဴတာမွာဘယ္ဖိုင္ေတြရွိတယ္၊ဘယ္ကြန္ျပဴတာမွာ ဘယ္ဖိုင္ေတြလိုအပ္ေနတယ္ဆိုတဲ  ့သတင္းအခ်က္အလက္ေတြကို သိမ္းဆည္းလမ္းညႊန္ေပးပါတယ္။

How To Download Torrent

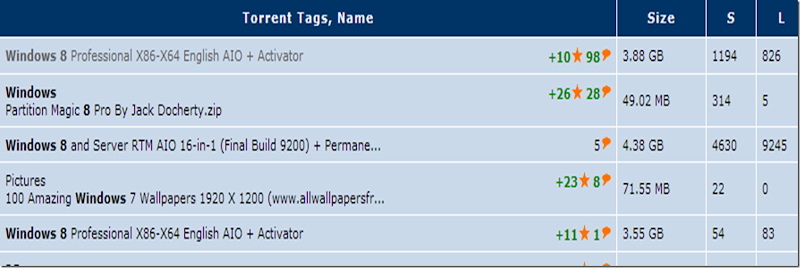
Torrent ဖိုင္တစ္ခု ကိုေဒါင္းလုပ္လုပ္ဖို ့ torrent client တစ္ခုကို အရင္ သင့္ကြန္ျပဴတာမွာ download and install လုပ္ပါ။ဒီေဆာင္းပါးမွာေတာ့ utorrent ကိုသံုးပါမယ္။ျပီးရင္ isohunt torrent site  ကိုသြားျပီး search box မွာ windows 8 လုိ ့ရိုက္ျပီး ရွာပါ။Torrent ဖိုင္တစ္ခုကိုမေဒါင္းခင္မွာ အရင္ေလ့လာပါ။Share ratio ေကာင္းတဲ့ဖိုင္ကိုေရြးခ်ယ္ပါ။Seeder က leecher အေရအတြက္ထက္ပိုမ်ားတဲ့ဖိုင္ကိုေရြးခ်ယ္ပါ။Torrent တစ္ခ်ိဳ ့ဟာ fake torrent(virus) ေတြျဖစ္ႏိုင္လို ့ကြန္းမန္ ့ေတြကိုဖတ္ျပီးေလ့လာဖို ့လည္းအေရးၾကီးပါတယ္။

2 

ေလ့လာျပီးရင္ေတာ့ သင္ေဒါင္းခ်င္တဲ့ဖိုင္ကို ႏွိပ္လိုက္ျပီး download page ကိုေရာက္ရင္ Download .torrent လင့္ကိုႏွိပ္ျပီး torrent ဖိုင္ကိုေဒါင္းလုပ္လုပ္ပါ။Torrent ဖိုင္ေတြဟာဖိုင္ဆိုက္ေသးငယ္ျပီး (100) kb ေအာက္ေသးငယ္တဲ့ ဆိုက္ပဲရွိပါတယ္။

3

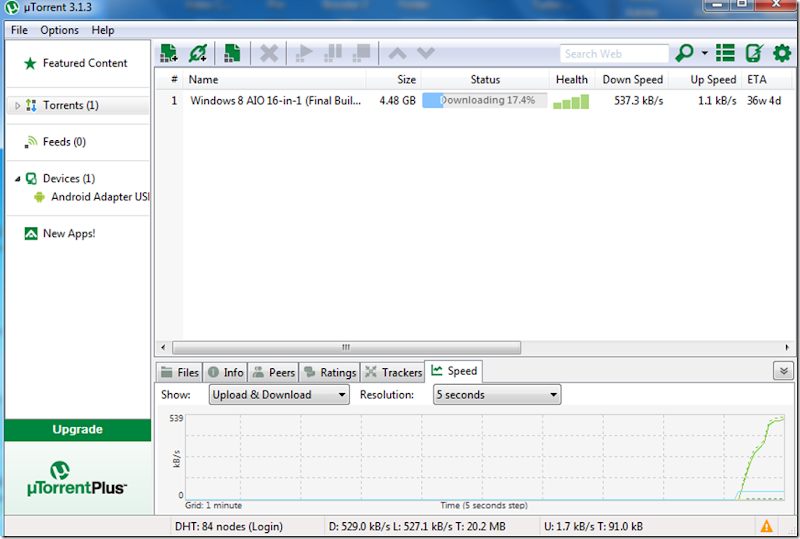
ရရွိလာတဲ့ torrent ဖိုင္ကို double click ႏွိပ္လိုက္ရင္ utorrent(torrent client) အလိုလိုပြင့္လာျပီး စတင္ေဒါင္းလုပ္လုပ္ပါလိမ့္မယ္။ဒါမွမဟုတ္ utorrent ကိုဖြင့္ျပီး  file menu ေအာက္က add a torrent ကိုႏွိပ္ျပီး ေဒါင္းထားတဲ့ torrent ဖိုင္ကိုေရြးေပးျပီး ေဒါင္းႏိုင္ပါတယ္။

4

Torrent ဖိုင္တစ္ခု ေဒါင္းလုပ္လွ်င္ျမန္မွုဟာ share ratio ေပၚမူတည္သလို သင့္ကြန္နက္ရွင္ေပၚလည္းမူတည္ပါတယ္။ေဒါင္းလုပ္ျပီးစီးသြားရင္ utorrent ကိုပိတ္ႏိုင္သလို မပိတ္ဘဲထားျပီးတစ္ျခား သူေတြကို ျပန္ျပီး upload လုပ္ႏိုင္ပါတယ္။

Free Download Nero 12 Platinum (12.0.02900) With Serial And Patch

1

Nero video,nero kwik media,nero burning rom,nero recode,nero backitup စတဲ့ applications ေတြစံုလင္စြာပါရွိတဲ့ complete multimedia suite ပါ။အရင္ versions ေတြနဲ ့ႏွိုုင္းယွဥ္ၾကည့္ဖို ့ compare versions page မွာဖတ္ရွုပါ။Nero video ျဖင့္ video ေတြကို edit လုပ္ႏိုင္ပါတယ္။video,music ,media ဖိုင္ေတြအားလံုးကို nero kiwik media ကေန ၾကည့္ရွုနားဆင္ႏိုင္ပါတယ္။Nero burning rom ျဖင့္ cd,dvd,blu-ray disc ေတြကို burn ေပးႏိုင္ပါတယ္။Nero recode ျဖင့္ video and audio conversion ေတြျပဳလုပ္ႏုိင္ပါတယ္။Nero backitup ကေတာ့ သင့္ဖိုင္ေတြကို live backup ျပဳလုပ္ေပးႏိုင္ပါတယ္။ Video tutorial and Manual ေတြကို official nero website မွာေလ့လာႏိုင္ပါတယ္။Windows 8 compatible ျဖစ္ပါတယ္။

Nero 12 Platinum features seven of our most popular applications in one convenient bundle. Creative packs and free extension tools make it the complete multimedia suite – and the only one you’ll ever need to burn, edit, backup, rip, convert and play your movies, music and photos.

Applications
Nero Video

Nero Video

Edit videos, author high-quality discs and so much more. Nero Video is the full-featured video editor that is easy for novices to use, while still offering the precision and control desired by more advanced users. Dozens of creative templates make your movies and discs look like they were done by the pros.

Nero Kwik Media

Nero Kwik Media

Use Nero Kwik Media to catalog, access, sync and stream all of your movies, videos, photos and music. Its built-in video and audio player can handle just about any disc-based or file-based format.

Nero Burning ROM

Nero Burning ROM

Rip Audio CDs, burn and copy CDs, DVDs and Blu-ray Discs™ with the gold-standard burning engine in Nero Burning ROM.

Nero Recode

Nero Recode

An extremely powerful, yet simple-to-use application for converting disc- and file-based videos to other formats. Nero Recode supports virtually all of the latest video and audio formats. Plus, it has preconfigured profiles for the most popular home entertainment and mobile devices, so you can get perfect results even if you don’t want to fuss with the details.

Nero BackItUp

Nero BackItUp

With Nero BackItUp, it’s a cinch to disaster-proof your important data. Schedule a routine backup of files, folders or your entire PC and choose from a huge range of supported devices.

Nero RescueAgent

Nero RescueAgent

Another layer of protection to help ensure you don’t lose any of your irreplaceable files. Easily recover damaged or corrupted files from your optical disc, PC, USB drives and other media with Nero RescueAgent.

Nero Express

Nero Express

When all you want to do is quickly burn or copy a disc, Nero Express gets the job done reliably, every time.

Download Nero 12 platinum from Directmirror  (or)  Tusfiles  (309)  mb

Download key and patch from Dropbox 
Saturday, November 24, 2012

How To Install Windows From A USB Stick

1

USB stick ကေန ၀င္းဒိုးတင္ဖို ့နည္းေ၀မွ်လိုက္ပါတယ္။ဒီနည္းက သင့္ကြန္ျပဴတာမွာ cd/dvd drive မရွိလို ့ဘဲျဖစ္ျဖစ္ ၊သယ္ယူရလြယ္ကူတဲ့ USB stick ႏွင့္သင့္သူငယ္ခ်င္းေတြဆီကေန ၀င္းဒိုး ကူးယူလာျပီး အဲဒီ ကေန ၀င္းဒိုးတင္ခ်င္လို ့ဘဲျဖစ္ျဖစ္အသံုး၀င္မွာပါ။ အဲဒီ အတြက္  Microsoft ရဲ ့ Windows 7 USB/DVD Download Tool ကို အ သံုးျပဳမွာပါ။ Windows 7 လို ့နာမည္တပ္ထားေပမယ့္ windows 8 iso ဖိုင္ေတြနဲ ့လည္းအလုပ္လုပ္ႏိုင္သလို windows xp, vista, 7  တို ့မွာ install လုပ္ျပီးအသံုးျပဳႏိုင္ပါတယ္။တစ္ခုသတိထားရမွာက အဲဒီ tool က သင့္ USB stick ကို ေဖာ္မက္ ခ် မွာပါ။အဲဒီအတြက္ USB stick ထဲက ဖုိင္ေတြကို Backup လုပ္ထားပါ။သင္ install လုပ္မယ္ ့၀င္းဒိုး ရဲ ့ iso ဖိုင္ကို လည္းဖန္တီးရပါမယ္။

Creating A ISO File

အြန္လိုင္းကေန windows iso ဖိုင္ေတြကို ေဒါင္းလုပ္ရရွိထားရင္ေတာ့ ဒီအဆင့္ကို ေက်ာ္ႏိုင္ပါတယ္။Cd/dvd ေခြကေန iso ဖိုင္ဖန္းတီးမယ့္သူေတြအတြက္ Express BurnPower ISO တို ့ကို သံုးပါ။၀င္းဒိုး ေခြကို ထည့္ျပီး အဲဒီ ေဆာ့၀ဲ ေတြ သံုးျပီး create image from cd/dvd ကိုေရြးျပီး  iso image ကိုအလြယ္တကူဖန္တီးႏိုင္ပါတယ္။

Using Windows 7 USB/DVD Download Tool

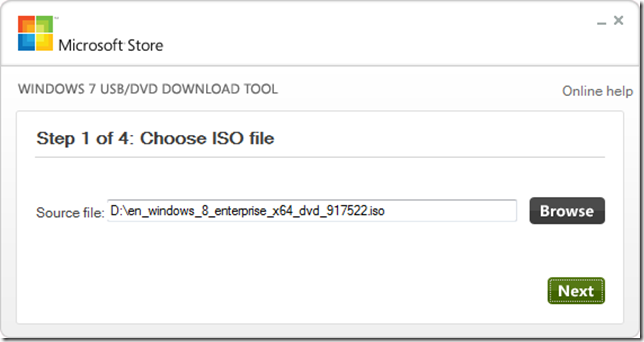
Windows 7 USB/DVD download Tool ကို ေဒါင္းလုပ္လုပ္ျပီးရင္ install လုပ္ျပီး run ျပီး iso ဖိုင္ကိုေရြးေပးပါ။

2

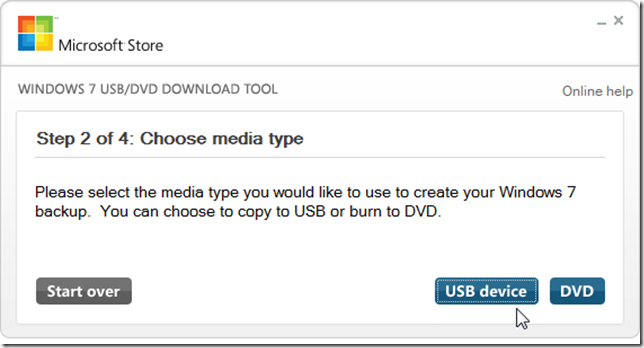
USB device ကိုႏွိပ္ပါ။

3

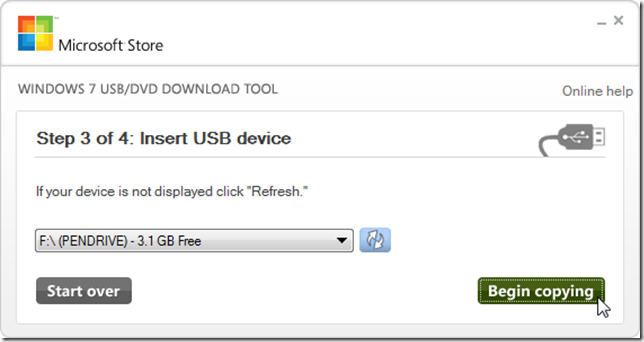
Usb stick ကိုကြန္ျပဴတာနဲ ့ ခ်ိတ္ဆက္ျပီး Begin copying ႏွိပ္ပါ။

4

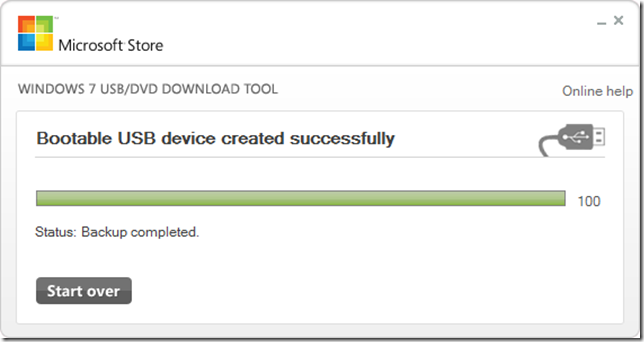
ဒါဆိုရင္သင့္ usb stick ကိုေဖာက္မက္ခ်ျပီး windows installer ဖိုင္ေတြကိုစတင္ကူးပါျပီ။ျပီးရင္ေတာ့ “Backup completed” ကိုေတြ ့ျမင္ရမွာပါ။

5

Install Windows

USB stick ကေန ၀င္းဒိုး install လုပ္ဖို ့အတြက္ usb stick ထဲက setup.exe ကို run ျပီး install လုပ္ပါ။သင့္ကြန္ျပဴတာမွာ ဘာ၀င္းဒိုးမွ install လုပ္မထားရေသးတဲ့သူေတြအတြက္ Boot order မွာ  usb ကေန boot တက္ျပီး install လုပ္ႏိုင္ပါတယ္။

Friday, November 23, 2012

How To Stream Audio From Windows To Android

1

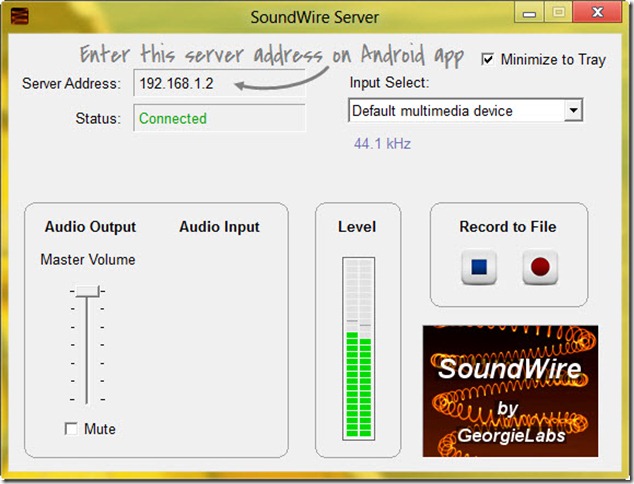
Windows ကြန္ျပဴတာကေနဖြင့္ထားတဲ့သီခ်င္းေတြကို android device ေတြမွာနားေထာင္လို ့ရေအာင္ျပဳလုပ္ေပးႏိုင္တဲ့ SoundWire ပါ။ဒီလိုျပဳလုပ္ဖို ့အတြက္ ၀င္းဒိုး ကြန္ျပဴတာမွာ soundwire server application ကို သြင္းရမွာျဖစ္ျပီး android device မွာေတာ့ SoundWire Free Application  ကို သြင္း ထား ရ ပါ မယ္။  ျပီး ရင္ ကြန္ ျပဴ တာ က ေန wifi လႊင့္ဖို ့ Connectify ကိုလည္းသင့္ကြန္ျပဴတာမွာသြင္းထားရပါမယ္။

Applications ေတြသြင္းျပီးရင္ သင့္ကြန္ျပဴတာကေန wifi လႊင့္ျပီး android device မွာခ်ိတ္ဆက္ထားပါ။ျပီးရင္ ကြန္ျပဴတာက soundwire server application ကိုဖြင့္ပါ။

2

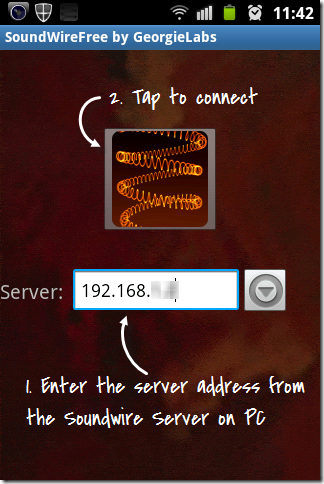
Android device က soundwire application ကိုဖြင့္ျပီး server address ေနရာမွာ soundwire server application က server address ကိုထည့္ေပးျပီး soundwire ပံုကိုႏွိပ္ေပးပါ။ဒါဆိုရင္ေတာ့ သင့္ကြန္ျပဴတာက ဖြင့္တဲ့သီခ်င္းေတြကို android device မွာနားေထာင္လို ့ရပါျပီ။

3

Download SoundWire Server Application(Windows) @  georgielabs.cjb.net/

Download SoundWire Free Application(Android) from 1mobile.com @ www.1mobile.com/soundwire-free-version-445868.html

Wednesday, November 21, 2012

How To Convert A Video Into GIF Animation Format

Video ဖိုင္ေတြကို gif ဖိုင္အျဖစ္ေျပာင္းခ်င္ရင္ေတာ့ freeware တစ္ခုနဲ ့မိတ္ဆက္ေပးပါရေစ။Video file ေတြျဖစ္တဲ့ mp4,avi,mpeg,wmv စတဲ့ ဖိုင္ေတြကို gif ဖိုင္အျဖစ္ေျပာင္းလဲေပးႏုိင္တဲ့ movie to animated gif converter ပါ။တစ္ျခား movie ဖိုင္ေတြကိုအေပၚကဖိုင္ေဖာက္မက္ ေတြအျဖစ္ေျပာင္းလဲႏိုင္ဖို ့ Converters ေတြလည္းတင္ေပးထားပါတယ္။Movie to animated gif converter ကဖိုင္ဆိုက္ကလည္း (70) kb ၀န္းက်င္ သာရွိျပီးေသးငယ္ျပီးအသံုးျပဳရတာလြယ္ကူတဲ ့ အျပင္ Install လုပ္စရာမလို တဲ့ portable အမ်ိဳးအစားပါ။

Movie to animated gif converter ကို run ျပီးရင္ Open Movie ကိုႏွိပ္ျပီး movie ဖိုင္ကို ေရြးေပးပါ။Movie တစ္ကားလံုးကေနသင္ၾကိဳက္ႏွစ္သက္တဲ့အပိုင္းကိုပဲ ေရြးျပီး gif ဖိုင္ျပဳလုပ္ဖို ့ start point and end point သတ္မွတ္ေပးရမွာပါ။Start point သတ္မွတ္ဖို ့ slider bar ႏွစ္ခုထဲက အေပၚက slider bar ကိုအသံုးျပဳျပီး ေနရာေရြးပါ။ျပီးရင္ ဘယ္ဘက္ေထာင့္က   {   (start button)  ကိုႏွိပ္ပါ။End point ကိုသတ္မွွတ္ဖို ့ကိုလည္း အေပၚက slider bar ကိုပဲအသံုးျပဳေနရာသတ္မွတ္ေပးျပီး   }   (end button) ႏွိပ္ေပးပါ။

1

Save Frame ကိုႏွိပ္ျပီး gif ဖိုင္အေနနဲ ့သိမ္းပါ။Frame size ကို လည္းေရြးႏိုင္ပါတယ္။သိမ္းမယ့္ေနရာကို ေရြးေပးျပီး ok ႏွိ္ပ္ပါ။ဖိုင္ဆိုက္အၾကီးအေသးေပၚမူတည္ျပီးအခ်ိန္ၾကာျမင့္ပါလိမ့္မယ္။ျပီးရင္ေတာ့ သင့္ movie ဖိုင္ ဟာ gif ဖိုင္အေနနဲ ့ရရွိပါလိမ့္မယ္။

2

Download Movie To Animated GIF Converter @ www.evanolds.com/movtogifsimple.html

Tuesday, November 20, 2012

Security Score : Analyzes & Rates Your PC’s Protection Against Malware

1

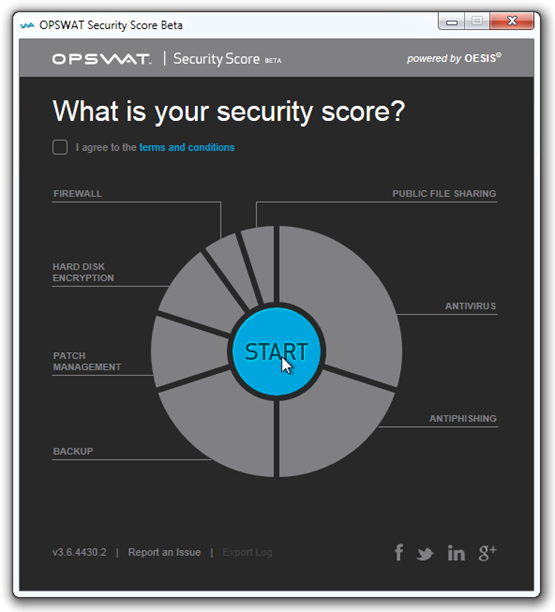
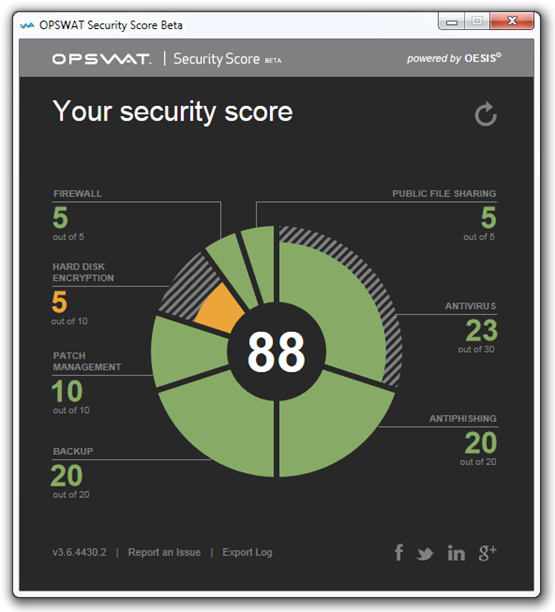
Virus အသစ္ေတြဟာေန ့တိုင္းလိုလို ထြက္ရွိေနတဲ့အတြက္ သင့္ ကြႏ္ျပဴတာရဲ ့ virus ကာကြယ္မွုအပိုင္းကို အျမင့္ဆံုးအေနအထားမွာေရာက္ေအာင္ ထားရွိသင့္ပါတယ္။Antivirus and Anti Malware Softwares ေတြကိုအသံုးျပဳျခင္း၊ေန ့တုိင္း update လုပ္ေပးျခင္းျဖင့္ သင့္ကြန္ျပဴတာကို ကာကြယ္ထားသင့္ပါတယ္။Security Score ဆိုတဲ့ freeware ကေတာ့ သင့္ကြန္ျပဴတာက security related programs ေတြျဖစ္တဲ့ Firewall, Hard Disk Encryption, Patch Management (Windows Updates), Backup, Public File Sharing, Antivirus and Anti-Phishing စတာေတြကို scan လုပ္ေပးႏိုင္ျပီး သူတို ့ေတြရဲ ့စြမ္းေဆာင္မွုေတြကို အမွတ္ေပးတြက္ခ်က္ျပီး ပိုမိုေကာင္းမြန္ေအာင္ အၾကံေပးႏိုင္ပါတယ္။

Security Score ကို run ျပီး terms and conditions ကို agree လုပ္ျပီးရင္ start ကိုႏွိပ္ျပီးသင့္ကြန္ျပဴတာရဲ ့ security score ကိုစတင္တြက္ခ်က္ခိုင္းလို ့ရပါျပီ။

1

Scan လုပ္ခ်ိန္ဟာ စကၠန္ ့ပိုင္းပဲၾကာျမင့္ျပီး သင့္ ကြန္ျပဴတာရဲ ့အားနည္းတဲ့ အပိုင္းေတြအားသာခ်က္ေတြကို အမွတ္ေတြ တြက္ခ်က္ျပီး ေဖာ္ျပေပးပါလိိမ့္မယ္။

1

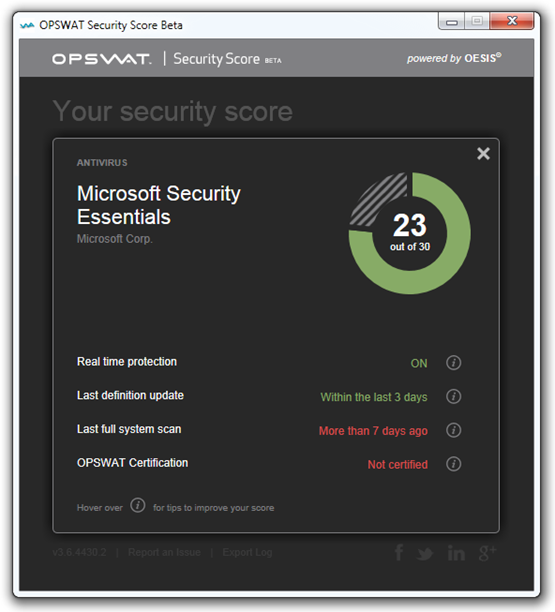
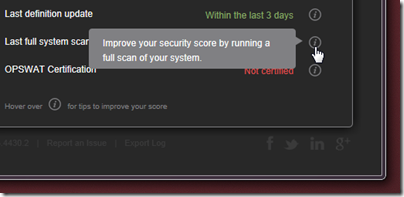
အ ခ်က္ အ လက္ အ   ေသး စိတ္သိႏိုင္ဖို ့ အ ပိုင္း တစ္ပိုင္းခ်င္းစီကို click ႏွိပ္ၾကည့္ပါ။ အားနည္းခ်က္ေတြကို အနီေရာင္ျဖင့္စာေရးျပသထားျပီး exclamation mark ေပၚကို mouse cursor တင္ၾကည့္ျပီး လိုအပ္ခ်က္ေတြကို သိရွိျပဳျပင္ႏိုင္ပါတယ္။

2


1

Download Security Score @ www.opswat.com/products/security-score

PanicButton : Quickly Hide Chrome Tabs & Restore Them Later With A Password

သင့္ ရဲ ့ privacy ကိုကာကြယ္ေပးႏိုင္တဲ့ chrome extension တစ္ခုပါ။သင့္ရဲ ့ online banks ,credit cards စတဲ့ အေရးၾကီးတဲ့ သတင္းအခ်က္အလက္ေတြသိမ္းထားတဲ့ဆိုက္ေတြၾကည့္ေနတုန္း တစ္ျခားတစ္ေယာက္ေရာက္လာခဲ့ရင္ အလွ်င္ျမန္ဆံုး tabs ေတြကို hide လုပ္ေပးႏိုင္ပါတယ္။ ျပီးမွ ျပန္ျပီး restore လုပ္ေပးႏိုင္တဲ့ chrome extension တစ္ခုပါ။

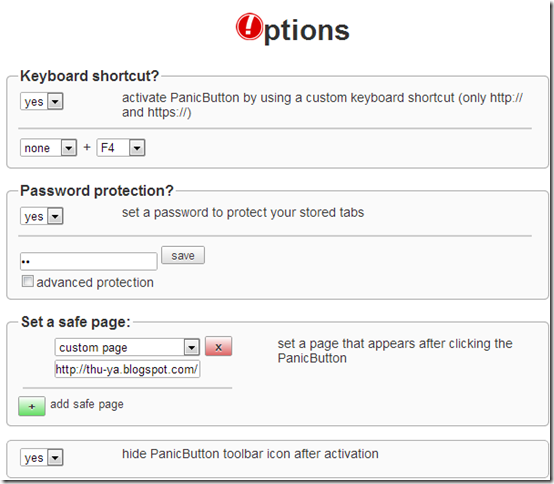
Extension ကို install လုပ္ျပီးရင္ extension page ကိုသြားျပီး PanicButton option ထဲကို၀င္ပါ။PanicButton ရဲ ့ keyboard shortcut ကိုသတ္မွတ္ေပးႏိုင္သလို tabs ေတြကို restore လုပ္တဲ့အခ်ိန္မွာ password protection ထားႏိုင္ပါတယ္။PanicButton ႏွိပ္လိုက္တဲ့အခ်ိန္မွာ မကြယ္၀ွက္ဘဲထားရိွႏိုင္မယ့္ safe page ေတြကိုလည္းသတ္မွတ္ထားႏိုင္ပါတယ္။Tabs ေတြကို hide လုပ္ျပီးတဲ့အခိ်န္မွာ browser မွာ PanicButton ကို ကြယ္၀ွက္ထားခ်င္ရင္ေတာ့ hide PanicButton toolbar icon after activation ဆိုတဲ့ option မွာ yes ေရြးေပးပါ။

2

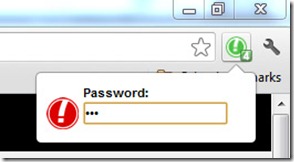
Browser က PanicButton ကိုႏွိပ္ျပီး tabs ေတြကို hide လုပ္ျပီးရင္ restore လုပ္ဖို ့အတြက္ PanicButton ကိုျပန္ႏွိပ္ျပီး password ရိုက္ထည့္ျပီး အလြယ္တကူ restore လုပ္ႏိုင္ပါတယ္။

3

Checkout PanicButton @ https://chrome.google.com/webstore/detail/faminaibgiklngmfpfbhmokfmnglamcm

Simple Startup Password : Set A Password On Your Google Chrome Browser

Browser မွာအေရးၾကီးတဲ့သတင္းအခ်က္အလက္ေတြ သိမ္းထားျပီးတစ္ျခားသူေတြကို အသံုးမျပဳေစခ်င္ရင္ေတာ့  browser ကို password ခတ္ျပီးအသံုးျပဳပါ။ဒီလိုအသံုးျပဳႏိုင္ဖို ့ကူညီေပးႏိုင္တဲ့ simple startup password ဆိုတဲ့ google chrome extension ရွိပါတယ္။ Chrome browser အတြက္ပဲ အသံုးျပဳႏိုင္ေသးျပီး firefox user ေတြအတြက္ေတာ့ မထြက္ရွိေသးပါဘူး။

Simple startup password ကို chrome မွာ သြင္းျပီးရင္ေတာ့ extension page ကိုသြားျပီး simple startup password ရဲ ့ option ထဲ၀င္ျပီး password ေပးပါ။ျပီးရင္ေတာ့ chrome browser ကိုဖြင့္တိုင္း password ေတာင္းမွာပါ။အဲဒီအတြက္သင့္ browser ကို တစ္ျခားသူေတြအသံုးမျပဳႏိုင္ေတာ့ပါဘူး။

1

Checkout Simple Startup Password @ https://chrome.google.com/webstore/detail/ojoalkffommhmdmbohjphohoejjmgepc

Saturday, November 17, 2012

APK Batch Installer

1

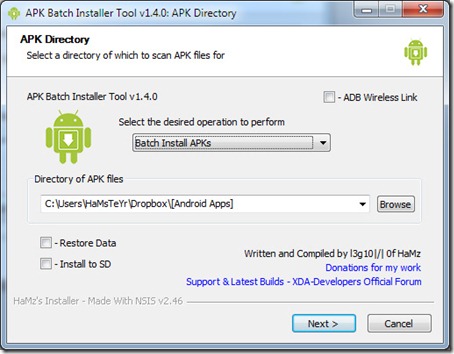
Android device application ေတြျဖစ္တဲ့ (.apk) ဖိုင္ေတြကို ကြန္ျပဴတာကေန အမ်ားအျပားတစ္ခါတည္း install လုပ္ေပးႏုိင္တဲ့ windows software ပါ။Application ေတြကို sd card မွာဒါမွမဟုတ္ internal memory မွာ install လုပ္ဖို ့ေရြးခ်ယ္ႏိုင္ပါတယ္။ဒါ့အျပင္ android က application ေတြ ရဲ ့ (.apk) ဖိုင္ေတြကို computer မွာ backup လုပ္ေပးႏိုင္ပါတယ္။ကြန္ျပဴတာက (.apk) ဖိုင္ေတြကို batch rename လုပ္ေပးႏိုင္ပါတယ္။Application data backup and restore လည္းလုပ္ေပးႏိုင္ပါတယ္။SMS backup and restore feature လည္းပါရွိပါတယ္။

ဒီေဆာ့၀ဲကို အသံုးျပဳဖို ့အတြက္သင့္ android device ဟာ root လုပ္ျပီးသားျဖစ္ရပါမယ္။Android device ရဲ ့ setting>application>development>usb debugging ရဲ  ့ check box မွာအမွန္ျခစ္ေပးထားရပါမယ္။

1

Apk batch installer က freeware ပါ။Developer site မွာ latest version ကို ေဒါင္းလုပ္လုပ္ႏိုင္ပါတယ္။

Download apk batch installer latest version @ forum.xda-developers.com/showthread.php?t=1531880

Download apk batch intaller (1.4.1) @ Dropbox  (or)  Directmirror 
Friday, November 16, 2012

Tips To Speed Up Your Computer’s Boot Time

ကြန္ျပဴတာ boot time ကိုျမန္ေအာင္လုပ္ဖို ့နည္းလမ္းမ်ားကို  အင္တာနက္ မွာရွာျပီးေတာ့ အေကာင္းဆံုး အၾကိဳက္ဆံုးနည္းေတြကို မွ်ေ၀လိုက္ပါတယ္။Windows startup program ေတြကို disable လုပ္ျခင္း၊startup မွာ run တဲ့ services ေတြကို delay လုပ္ေပးျခင္း၊BIOS setting မွ boot order ကိုျပင္ျခင္း၊အသံုးမျပဳတဲ့ drivers ေတြကို disable လုပ္ျခင္း၊ကြန္ျပဴတာကို ေလးလံေစမယ့္ malware ေတြကို ရွင္းေပးျခင္း၊အသံုးမျပဳတဲ့ ေဖာင့္ေတြကို ရွင္းထုတ္ျခင္း၊PC optimization softwares ေတြကို မွန္မွန္ကန္ကန္နဲ ့အျမဲအသံုးျပဳေပးျခင္းျဖင့္ သင့္ကြန္ျပဴတာရဲ ့boot time ကိုလွ်င္ျမန္ေစႏိုင္ပါတယ္။

Tweak Your BIOS

8

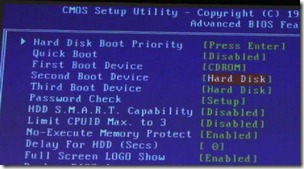
သင့္ကြန္ျပဴတာ boot တက္တဲ့အခ်ိန္မွာ BIOS setting ထဲက boot order priority အရ detect လုပ္ျပီး boot တက္တာျဖစ္ပါတယ္။ွသင့္ကြန္ျပဴတာ boot တက္တာဟာ hard disk ကေနျဖစ္တဲ့အတြက္ BIOS setting ထဲ၀င္ျပီး boot order မွာ hard disk ကိုအေပၚဆံုးမွာထားေပးပါ။တစ္ျခား boot device ေတြကို အေပၚဆံုးမွာထားရင္ detect လုပ္ေနရတဲ့ အခ်ိန္ကုန္ေစတဲ့အတြက္ boot speed ကိုေႏွးေစပါတယ္။ဒီလို လုပ္ဖို ့ ကြန္ျပဴတာ boot တက္လာခ်ိန္မွာ setup ထဲ၀င္မယ့္ key ကိုႏွိပ္ျပီး boot order မွာ သင့္ hard disk ကိုအေပၚဆံုးမွာထားေပးပါ။

Cleanout Programs That Launch At Startup

Startup programs ေတြကို disable လုပ္ဖို ့အတြက္ start menu ကေန msconfig လို ့ရိုက္ျပီး msconfig.exe ကိုဖြင့္ပါ။Startup menu ထဲကမလိုအပ္တဲ့ programs ေတြကို အမွန္ျခစ္ျဖဳတ္ျပီး apply ႏွိပ္ပါ။

1

Delay Windows Services That Launch At Startup

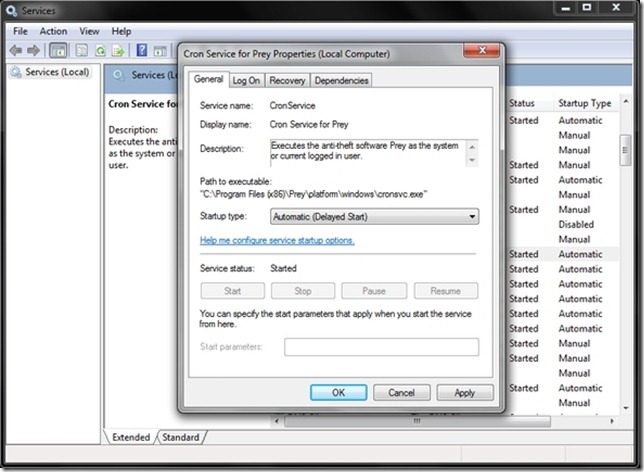
Windows services ေတြ၊ application ေတြရဲ ့ services ေတြကို delay startup လုပ္ေပးျခင္းျဖင့္လည္း boot time ကိုလွ်င္ျမန္ေစပါတယ္။ဒီလိုလုပ္ဖို ့ Tools menu ကိုသြားျပီး computer management ကိုေရြးျပီး launch ကိုႏွိပ္ပါ။

2

ျပီးရင္ services and applications ေအာက္က services ကို double click ႏွိပ္ပါ။သင္ဟာ windows services ေတြအေၾကာင္းေကာင္းေကာင္းမသိရင္ေတာ့ third party application ေတြရဲ ့ services ေတြကို ပဲေရြးခ်ယ္ျပီး delay start လုပ္ေပးသင့္ပါတယ္။သင္ delay လုပ္ခ်င္တဲ့ service ကို double click ႏွိပ္ျပီး startup type မွာ Automatic (Delayed Start) ကိုေရြးေပးျပီး apply ႏိွပ္ပါ။

3

Disable Unused Hardware

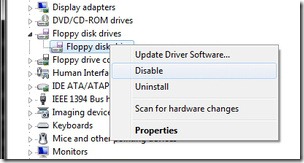
သင့္ကြန္ျပဴတာ boot တက္တဲ့အခ်ိန္မွာ drivers ေတြအေတာ္ေတာ္မ်ားမ်ား ကို load လုပ္ပါတယ္္။အသံုးမျပဳတဲ့ hardware ေတြကို disable လုပ္ေပးျခင္းျဖင့္ boot speed ကိုျမွင့္တင္ႏိုင္ပါတယ္။ဒီလိုလုပ္ဖို ့အတြက္ start menu ကေန device manager လိုိ ့ရိုက္ျပီး device manager ကို ဖြင့္ပါ။ သင္ဟာ bluetooth , modem ,floppy disk ေတြအသံုးမျပဳဘူးဆိုရင္ အဲဒီ device အေပၚမွာ right click ႏွိပ္ျပီး disable ႏွိပ္ပါ။

4

Remove Unnecessary Fonts

Windows startup မွာေဖာင့္ေတြကို လည္း load လုပ္ပါတယ္။သင္အသံုးမျပဳတဲ့ ေဖာင့္ေတြကို hide လုပ္ေပးျခင္းျဖင့္ သင့္ boot speed ကို ပိုမိုျမန္ေစပါတယ္။ကြ်န္ေတာ့္ စက္ထဲမွာေတာ့ ေဖာင့္အမ်ိဳးအစား (556) မ်ိဳး ေတြ ့ရပါတယ္။အသံုးမျပဳတဲ့ေဖာင့္အေတာ္မ်ားမ်ားကို ေရြးျပီး hide လုပ္ေပးပါ။ဒီလို လုပ္ဖို ့ start menu ကေန fonts လို ့ရိုက္ျပီး fonts folder ကိုသြားပါ။ျပီး ရင္ အသံုးမျပဳတဲ့ေဖာင့္ေတာ္ေတာ္မ်ားမ်ားကိုို ေရြးျပီး hide  ကိုႏွိပ္ပါ။

5

Keep Your Antivirus Running And Up To Date

သင့္စက္ထဲမွာ virus,malware ေတြရိွေနရင္လည္းသင့္စက္ boot speed ကိုေႏွးေကြးေစပါတယ္။အဲဒီအတြက္ antivirus and anti malware ေကာင္းေကာင္းေတြကို အသံုးျပဳျပီး virus definition ေတြကို အျမဲ update လုပ္ေပးျပီး အျမဲ scan လုပ္ေပးသင့္ပါတယ္။Antivirus and Anti Malware Softwares ေတြကိုတင္ေပးထားပါတယ္။ၾကိဳက္ႏွစ္သက္ရာေရြးခ်ယ္အသံုးျပဳုပါ။

PC Optimization Softwares

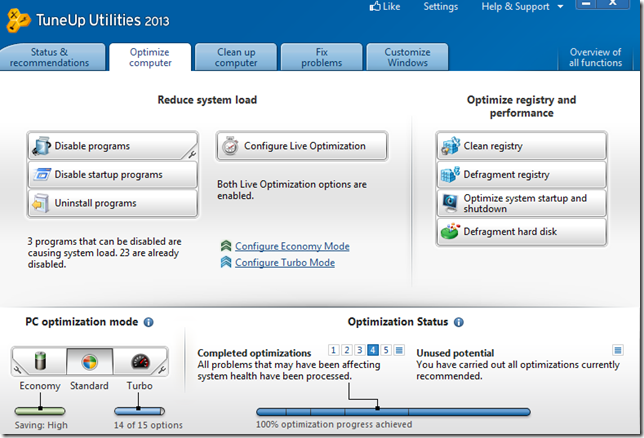
PC Optimization Softwares  ေတြကို  တင္ေပးထားပါတယ္။ အဲဒီေဆာ့၀ဲေတြကိုသံုးျပီး ကြန္ျပဴတာကို ေန ့စဥ္ maintenance လုပ္ေပးပါ။အဲဒီထဲကမွ CCleaner နဲ ့ Tuneup Utility 2013 ဟာကြ်န္ေတာ့္ personal favourite ပါ။CCleaner ဟာ ေပါ့ပါးလွ်င္ျမန္ျပီး registry ,temporary file ေတြကိုရွင္းေပးႏိုင္လို ့နာမည္ၾကီးပါတယ္။Tuneup Utility ရဲ ့ features ေတြထဲက favourite feature ႏွစ္ခုအေၾကာင္းေျပာခ်င္ပါတယ္။Tuneup start center ကိုဖြင့္ျပီးရင္ ေအာက္က window ေပၚလာမွာပါ။

5

Disable programs

အဲဒီကေန Disable programs ကိုႏွိပ္ျပီးသင္ ေန ့စဥ္အသံုးျပဳေနက် နဲ ့ မရွိမျဖစ္ run ေနရမယ့္ program တစ္ခ်ိဳ ့ကိုပဲ ခ်န္ထားျပီး က်န္တဲ့ program ေတြအားလံုးကို disable လုပ္ေပးပါ။Tuneup Program Deactivator ကသင္အသံုးမျပဳတဲ့ program ေတြ background မွာ မ run ႏိုင္ေအာင္သတ္ေပးထားပါလိမ့္မယ္။အဲဒီအတြက္သင့္စက္ကို အလြန္လွ်င္ျမန္လာေစတာေတြ ့ရပါမယ္။Disable လုပ္ထားတဲ့ program ကို အသံုးျပဳခ်င္ရင္ ပံုမွန္အတိုင္းပဲ run ျပီးအသံုးျပဳႏိုင္ပါတယ္။

6

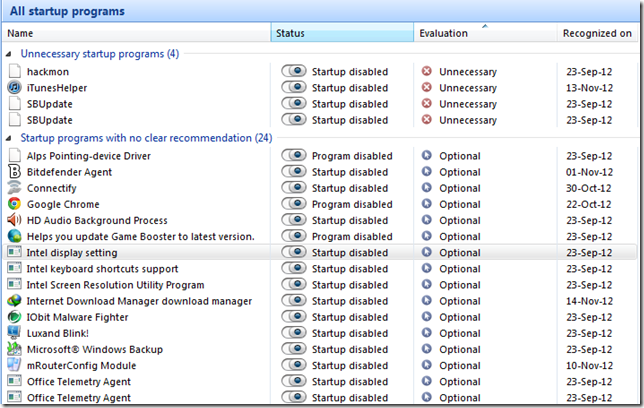
Disable startup programs

ျပီးရင္ tuneup start center main window ကိုျပန္သြားျပီး disable startup programs ကိုႏွိပ္ပါ။မရွိမျဖစ္ run ေနရမယ့္ startup program တစ္ခ်ိဳ ့ကိုပဲ ခ်န္ထားျပီး က်န္တဲ့ program ေတြအားလံုးကို disable လုပ္ေပးပါ။သင့္ ကြန္ျပဴတာ ရဲ ့ boot speed ျမန္ဆန္လာတာေတြ ့ရမွာပါ။

7

အေပၚကနည္းလမ္းေတြကိုအသံုးမျပဳခင္နဲ  ့အသံုးျပဳျပီးသင့္ကြန္ျပဴတာ ရဲ ့boot speed ဘယ္ေလာက္တက္လာသလဲသိရေအာင္ အခ်ိန္တိုင္းတာေပးတဲ့ BootRacer ေဆာ့၀ဲအေၾကာင္းေရးထားတဲ့ BootRacer : Test Your Windows Boot Speed ကိုဖတ္ျပီး သင့္ကြန္ျပဴတာရဲ  ့ boot speed ေတြကို မွတ္တမ္းတင္ျပီး ႏွိုင္းယွဥ္ၾကည့္ပါ။

BootRacer : Test Your Windows Boot Speed

1

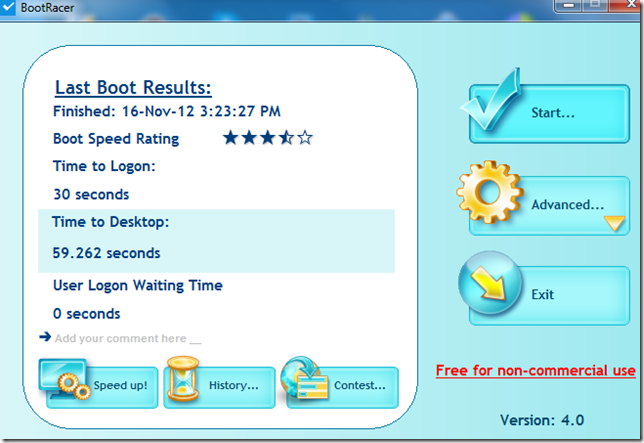
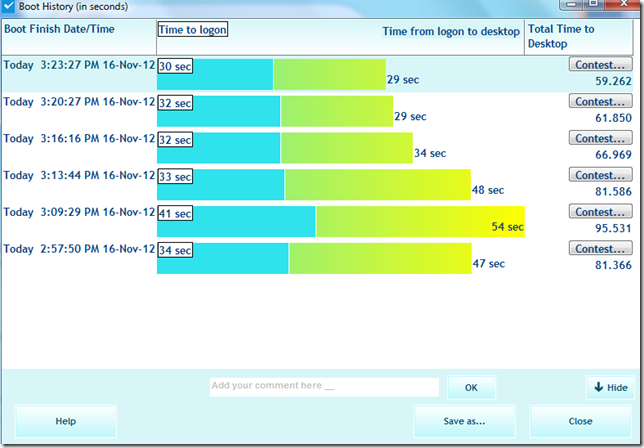
သင့္ ၀င္းဒိုး ကြန္ျပဴတာရဲ ့ boot speed ကို တြက္ခ်က္ေပးႏိုင္တဲ့ freeware ပါ။ Boot Speed ေတြကုိ record လုပ္ေပးထားျပီး history ထဲ၀င္ျပီး ႏွိုင္းယွဥ္ၾကည့္ရွုႏိုင္ပါတယ္။Windows 2000/XP/2003/Vista/2008/Seven/Windows 8(32 or 64 bit)စတဲ့ os ေတြကို support ေပးပါတယ္။PC Optimization Softwares ေတြကို တင္ေပးထားပါတယ္။အဲဒီေဆာ့၀ဲေတြကို အသံုးျပဳျပီး သင့္ကြန္ျပဴတာရဲ ့boot speed ကိုျမန္ဆန္ေအာင္ျပဳလုပ္ျပီး BootRacer ကေန ႏွိုင္းယဥ္ၾကည့္ရွုႏိုင္ပါတယ္။

Program ကိုဖြင့္ျပီး Start ကိုႏွိပ္လိုက္ရင္ Restart လုပ္ခိုင္းတဲ့ ၀င္းဒိုးေပၚလာျပီး restart လုပ္ျပီး သင့္ boot speed ကိုတြက္ခ်က္ေပးပါလိမ့္မယ္။Advanced setting ထဲက option ထဲမွာေတာ့ boot လုပ္တဲ့အခါတိုင္း BootRacer ကို တြက္ခ်က္ခိုင္းမလား၊တစ္ခါပဲသံုးမလားေရြးခ်ယ္ႏိုင္ျပီး၊boot တက္တဲ့အခ်ိန္မွာ BootRacer Window ကို ျပခိုင္းမလား ၊ background မွာ run ခိုင္းမလားစတာေတြ ေရြးခ်ယ္ႏိုင္ပါတယ္။

2

History ကိုႏွိပ္ၾကည့္ရင္ boot speed record ကိိုျပေပးထားျပီးႏွိုင္းယွဥ္ၾကည့္ရွုႏိုင္ပါတယ္။ပံုမွာျမင္ရတာကေတာ့ ကြ်န္ေတာ့္ ကြန္ျပဴတာရဲ ့ startup program ,services ေတြကို disable မလုပ္ခင္နဲ ့လုပ္ထားျပီး boot speed ေကာင္းလာပံု ကို ႏွိုင္းယွဥ္ၾကည့္ရွုႏိုင္ပါတယ္။

2

Logon user name and password ကိုရိုက္ရတာအခ်ိန္ၾကာပါတယ္။ အဲဒီအတြက္ make windows 7 & vista logon automatically ေဆာင္းပါးမွာဖတ္ပါ။ဒါမွမဟုတ္ Auto logon for windows ဆိုတဲ့ freeware ကိုသံုးပါ။ BootRacer ကို official site မွာ အခမဲ့ ေဒါင္းလုပ္လုပ္ႏိုင္ပါတယ္။Official site အေၾကာင္းအမ်ိဳးမ်ိဳးေၾကာင့္ပိတ္သြားရင္ ျဖစ္ျဖစ္ ၊freeware မဟုတ္ေတာ့ဘဲ ပိုက္ဆံေပး၀ယ္ရတဲ့ version ျဖစ္သြားရင္ျဖစ္ျဖစ္ အသံုးျပဳႏိုင္ေအာင္ ကြ်န္ေတာ္ ့ file hosting site မွာလည္းတင္ေပးထားပါမယ္။အဆင္ေျပတဲ့ေနရာကေဒါင္းျပီး သင့္ windows boot speed ကိုစမ္းသပ္ျပီးပိုမိုေကာင္းမြန္ေအာင္ျပဳလုပ္ႏုိင္ပါျပီ။Boot speed ျမန္ျမန္နဲ ့ကြန္ျပဴတာအသံုးျပဳႏိုင္ၾကပါေစ။

Download BootRacer Latest Version @ Official Site 

Download BootRacer 4.0 @ Dropbox (or) Directmirror (2.42)  mb