Friday, January 11, 2013

How To Prevent Files From Opening In Metro In Windows 8

1

Windows 8 မွာ image,music,video ဖိုင္တစ္ခုခု ကို ဖြင့္ၾကည့္ရင္ metro applications ေတြနဲ ့ဖြင့္ေပးမွာျဖစ္ပါတယ္။အဲဒီ metro apps ေတြကို မသံုးခ်င္ဘဲ အရင္၀င္းဒိုးေတြမွာလို windows media player , photo viewer ေတြနဲ ့ဖြင့္ခ်င္ရင္ေတာ့ default programs မွာ ျပင္ေပးရမွာပါ။

Charms bar (Win + C) ကို ႏွိပ္ျပီး Search ကိုႏွိပ္ပါ။Default Programs လို ့ရိုက္ထည္ ့ေပးျပီး Default Programs ကို ဖြင့္ပါ။

2

Set your default programs ကို ႏွိပ္ပါ။

3

Windows photo viewer ကိုေရြးျပီး “set this program as default” ကိုႏွိပ္ပါ။

4

Windows media player ကို ေရြးျပီး “set this program as default” ကို ႏွိပ္ပါ။ဒါဆိုရင္ သင့္ရဲ  ့ image,video,music ဖိုင္ေတြကို metro apps ေတြနဲ ့မဖြင့္ဘဲ အရင္၀င္းဒိုးေတြမွာလို windows media player,photo viewer ေတြနဲ ့ဖြင့္ေပးပါလိမ့္မယ္။

How To Take A Screenshot In Windows 8 With No Extra Software

Windows 8 မွာတစ္ျခားေဆာ့၀ဲေတြ မသံုးဘဲနဲ ့ အလြယ္တကူ screenshot ရိုက္ႏိုင္မယ့္နည္းေလးပါ။Windows 8 ကို ေဒါင္းလုပ္လုပ္ႏိုင္ဖို ့တင္ေပးထားပါတယ္။Windows 8 and 7 ကို dual-boot လုပ္နည္း၊dual-boot ကေန windows 8 ကို remove လုပ္နည္းေတြလည္းေရးေပးထားျပီးပါျပီ။Windows 8 start screen ကို customize လုပ္နည္း၊start menu အသံုးျပဳနည္း၊refresh and reset လုပ္နည္း၊automatically logon လုပ္နည္း၊full screen metro apps ေတြကို shut down and minimize လုပ္နည္းေတြကို လည္းေရးေပးထားပါတယ္။

Windows 8 မွာ လွ်င္လွ်င္ျမန္ျမန္ အလြယ္တကူ screenshot လုပ္ႏိုင္ဖို ့ Win + PrtScn(Print Screen) ကို ႏွိပ္လိုက္တာနဲ ့ desktop တစ္ခုလံုးကို screenshot ရိုက္ေပးပါလိမ့္မယ္။

1

ရိုက္ထားတဲ့ screenshot ကို ၾကည့္ဖို ့အတြက္ Win + E  ကို ႏွိပ္ျပီး windows explorer ကို ဖြင့္ပါ။Pictures library ထဲကို ၀င္ၾကည့္ရင္ အသစ္ ျပဳလုပ္ထားတဲ့ Screenshots ဖိုဒါကို ေတြ ့ျမင္ႏိုင္ျပီးဖိုဒါထဲ၀င္ျပီး သင့္ ရဲ  ့ screenshot ကို အသံုးျပဳႏိုင္ပါျပီ။

2

ဒါေပမယ့္ ဒီနည္းက desktop တစ္ခုလံုးကို screenshot ရိုက္မွာပါ။Windows ,menu,video,webpages ေတြကို screenshot ရိုက္ျပီး edit ပါလုပ္ႏိုင္ဖို ့tools ေတြ စံုလင္စြာပါရွိတဲ့ Ashampoo Snap 6 ကို တင္ေပးထားျပီး Windows 8 နဲ ့လည္း compatible ျဖစ္ပါတယ္။

How To Shut Down Or Minimize Full Screen Metro Apps In Windows 8

Ashampoo_Snap_2013.01.11_13h48m15s_002_

Windows8 Metro Applications ေတြကို ဖြင့္ ၾကည့္ရင္ close,minimize,maximize buttons ေတြကို ေတြ ့ရမွာမဟုတ္ပါဘူး။အခုေဆာင္းပါးမွာ keyboard , mouse စတာေတြကို အသံုးျပဳျပီး full screen metro applications ေတြကို close,minimize,maximize လုပ္တာေတြကို ေ၀မွ်ပါတယ္။Windows 8 pro ကို ေဒါင္းလုပ္လုပ္ဖို ့တင္ေပးထားပါတယ္။ေနာက္ျပီး Windows 8 မွာ start menu ကို ျပန္အသံုးျပဳႏိုင္ဖို ့ေဆာင္းပါး နဲ ့ start screen ကို customize လုပ္ႏိုင္ဖုိ ့ေဆာင္းပါး ေတြကိုလည္း ေရးေပးထားပါတယ္။

Use The Keyboard To Close A Metro App

အရင္ ၀င္းဒိုးေတြမွာ အသံုးျပဳတဲ့ နည္းလမ္းအတိုင္းပဲ Alt + F4 ကို ႏွိပ္ျပီး full screen metro app ေတြကို ပိတ္ႏိုင္ပါတယ္။

Ashampoo_Snap_2013.01.11_14h06m27s_003_

Use The Mouse To Close A Metro App

Application window ရဲ ့ အေပၚဆံုး အစြန္ကို mouse cursor ေရႊ  ့ပါ။လက္၀ါးပံုေပၚလာရင္ Left click ကို drag ဆြဲ ျပီး application window ရဲ  ့ ေအာက္ အစြန္းကို ဆြဲခ်ပါ။ဒါဆို application ပိတ္သြားပါလိမ့္မယ္။

Ashampoo_Snap_2013.01.11_14h17m14s_007_GXWINDOW

Minimize A Metro App

Application ကို keyboard ကိုိအသံုးျပဳျပီး minimize လုပ္ဖို ့အရင္ ၀င္းဒိုး ေတြ က နညး္အတိုင္းပဲ Win + D ကို ႏွိပ္ပါ။Mouse အသံုးျပဳျပီး minimize လုပ္ဖို ့အတြက္ဘယ္ဘက္ေအာက္ေထာင့္စြန္းကို mouse cursor ေရႊ  ့ပါ။Start screen ေပၚလာရင္ left click ႏွိပ္ပါ။Start screen ကို ျပန္ေရာက္သြားျပီး application ကေတာ့ background မွာ run ေနမွာပါ။

Ashampoo_Snap_2013.01.11_14h33m07s_010_

Restore,Close A Minimize App

Minimize လုပ္ထားတဲ့ metro applications ကို restore ,close လုပ္ဖို  ့ start screen က ဘယ္ဘက္အေပၚေထာင့္စြန္းကို mouse ေရႊ ့ျပီး thumbnail ေပၚလာရင္ left click ကို ႏွိပ္ရင္ application ကို ျပန္အသံုးျပဳႏိုင္ပါျပီ။ဒါမွမဟုတ္ ပိတ္ခ်င္ရင္ေတာ့ thumbnail ေပၚမွာ right click ႏွိပ္ျပီး close ကို ႏွိပ္ပါ။

Ashampoo_Snap_2013.01.11_14h37m44s_011_

Wednesday, January 9, 2013

How To Make Your Windows 8 PC Logon Automatically

Ashampoo_Snap_2013.01.10_12h20m09s_001_

Windows 7 & vista မွာ logon အလို အေလ်ာက္ ျပဳလုပ္ဖို ့ေဆာင္းပါး ေရးေပးျပီးပါျပီ။အခုတစ္ခါ Windows 8 မွာ logon အလိုအေလ်ာက္ျပဳ လုပ္ႏိုင္ဖို    ့ေရးေပးပါမယ္။ သင့္ windows 8 ကြန္ျပဴတာ  ကို ဖြင့္တိုင္း password ေတြ ရိုက္ထည့္ရတာအလုပ္ရွုပ္တယ္ဆိုရင္ဒီနည္းေလးကို သံုးၾကည့္ပါ။

Setting Windows 8 Logon Automatically

Win + R  ကို ႏွိပ္ျပီး Run box မွာ  netplwiz   လို ့ရိုက္ျပီး enter ႏွိပ္ပါ။

1

User Accounts dialog box ေပၚလာရင္ သင့္အေကာင့္ကို ေရြးခ်ယ္ျပီး “Users must enter a user name and password to use this computer” ဆိုတဲ့ check box မွာ အမွန္ျခစ္ျဖဳတ္ေပးျပီး Apply ကို ႏွိပ္ပါ။

2

Automatically sign in dialog box ေပၚလာရင္ password ရိုက္ထည့္ေပးျပီး ok ႏွိပ္ပါ။

3

User Accounts dialog box ျပန္ေရာက္သြားရင္ ok ႏွိပ္ေပးပါ။ဒါဆိုရင္သင့္ Windows 8 ကြန္ျပဴတာကို အသံုးျပဳတိုင္း password ရိုက္ထည့္ေပးစရာမလိုဘဲ အသံုးျပဳႏိုင္ပါျပီ။

Ways To Access Startup Settings In Windows 8

1

Windows 8 မွာ Safe Mode ကို ၀င္ဖို ့အရင္  Windows ေတြမွာ လို function key, F8 စတာေတြ ႏွိပ္ျပီး၀င္လို ့မရေတာ့ပါဘူး။BIOS configuration ထဲ၀င္လို ့လည္းမရေတာ့ပါဘူး။Startup Settings ကို အသံုးျပဳျပီးေတာ့ boot options menu ကို ၀င္ေရာက္ႏိုင္မွာပါ။ဒီေဆာင္းပါးမွာဒီနည္းေတြကို ေရးပါမယ္။

Through PC Setting

ပထမနည္းကေတာ့ pc setting ကေန ၀င္မွာပါ။Win+I ကို ႏွိပ္ျပီး Change PC Setting ကိုႏွိပ္ပါ။

2

General ကို ႏွိပ္ျပီး Advanced Startup ေအာက္က restart now ကိုႏွိပ္ပါ။

3

ေနာက္အဆင့္မွာေတာ့ Troubleshoot ကို ႏွိပ္ပါ။

4

ေနာက္အဆင့္မွာ Advanced options ကိုႏွိပ္ပါ။

5

Startup Settings ကို ႏွိပ္ပါ။

6

ေနာက္အဆင့္မွာ windows restart လုပ္ရင္ ေရြးခ်ယ္ႏိုင္မယ့္ options ကို ျမင္ေတြ ့ႏိုင္ျပီး restart ကို ႏွိပ္ပါ။

7

ဒါဆိုရင္ restart က်ျပီး Startup Setting Menu ကို ေရာက္ရွိပါျပီ။အဲဒီကေန safe mode ကို၀င္ေရာက္ႏိုင္ျပီး တစ္ျခား options ေတြကို လည္း၀င္ေရာက္ႏိုင္ပါတယ္။

8

Through The Power Option

ေနာက္တစ္နည္းကေတာ့ pc setting ထဲ ၀င္စရာမလိုတဲ့ အတြက္ပိုျမန္ပါတယ္။Win+ I ကိုႏွိပ္ျပီး power button ကိုႏွိပ္ပါ။Shift key ကိုဖိထားျပီး restart ကို ႏွိပ္ပါ။Troubleshoot screen ေပၚလာရင္ အေပၚကအဆင့္ေတြ အတိုင္းဆက္လုပ္ပါ။

9

Tuesday, January 8, 2013

Moborobo : The Most Comprehensive Android & IOS Management Tool

1

Android & IOS devices ေတြကို  computer ကေန manage လုပ္ႏိုင္မယ့္ tools ေတြစံုလင္စြာပါရွိတဲ့ software တစ္ခုပါ။Moborobo လုပ္ေပးႏိုင္တဲ့ အလုပ္ေတြကေတာ့ contacts,messages, call logs,images,media,applications,ringtones,themes,wallpaper စတာေတြကို သင့္ကြန္ျပဴတာမွာ backup and restore လုပ္ေပးႏိုင္ပါတယ္။Android , Ios device ရဲ  ့ screen ကို real time ေတြ  ့ျမင္ႏိုင္ျပီး screenshot ရိုက္ျပီး သိမ္းထားႏိုင္ပါတယ္။ကြန္ျပဴတာကေန message ေတြဖတ္ႏိုင္ ေပးပို ့ႏိုင္ျပီး သင့္ကြန္ျပဴတာကေန android,ios  applications ေတြကို လည္း install/uninstall လုပ္ႏိုင္ပါတယ္။Application store ပါရွိျပီး applications ေတြကို ေဒါင္းလုပ္လုပ္ႏိုင္ျပီး သင့္ android,ios devices မွာ တစ္ခါတည္း install လုပ္ႏိုင္ပါတယ္။Music file ေတြကို သင့္ကြန္ျပဴတာကေန နားဆင္ႏိုင္သလို ringtone ျပဳလုပ္ႏိုင္ပါတယ္။Video ဖိုင္ေတြကို လည္း ၾကည့္ရွုႏိုင္ပါတယ္။File manager ပါရွိျပီး computer and divices ေတြ နဲ ့ အျပန္အလွန္ဖိုင္ေတြ ေပးပို ့ႏိုင္ျပီး manage လုပ္ႏိုင္ပါတယ္။Supported devices ေတြကို www.moborobo.com/supporteddevices.html  မွာ ၾကည့္ ရွု ႏိုင္ ပါ တယ္ ။ Tutorial ေတြကို www.moborobo.com/tutorial/ မွာေလ့လာႏိုင္ပါတယ္္။

Connecting Your Android Device With Moborobo

ဒီ tutorial မွာ ေတာ့ android device ကို အသံုးျပဳမွာျဖစ္ပါတယ္။Moborobo ကို သင့္ကြန္ျပဴတာမွာ အင္စေတာလုပ္ျပီးရင္ usb or wifi နည္းႏွစ္မ်ိဳး နဲ့ သင့္ကြန္ျပဴတာနဲ ့ android device ကို ခ်ိတ္ဆက္ႏိုင္ပါတယ္။Moborobo application ကို run ျပီးရင္ Android device ကို usb နဲ ့ မခ်ိတ္ဆက္ခင္ Setting>application>unknown sources ကို အမွန္ျခစ္ေပးပါ။Setting>application>development>usb debugging ကို အမွန္ျခစ္ေပးပါ။Android device နဲ ့ ကြန္ျပဴတာကိုု usb အသံုးျပဳျပီး ခ်ိတ္ဆက္ပါ။Moborobo ကခ်ိတ္ဆက္လိုက္တဲ့ device ကို အလို လို သိရွိျပီး driver ကို အင္စေတာလုပ္ပါလိမ့္မယ္။ေနာက္ျပီး သင့္ device မွာလည္း moborobo application ကို အင္စေတာလုပ္ပါလိမ့္မယ္။ျပီးရင္ေတာ့ သင့္ android device နဲ့ moborobo ခ်ိတ္ဆက္မိျပီးေအာက္ကပံုမွာ လို   ျမင္ေတြ ့ ရမွာပါ။ သင္ၾကိဳက္ႏွစ္သက္ သေလာက္  devices အမ်ားအျပားကို တစ္ျပိဳင္နက္ခ်ိတ္ဆက္ႏိုင္ပါတယ္။Switch Devices ကိုႏွိ္ပ္ျပီးေတာ့ device ေတြကို ေရြးခ်ယ္အသံုးျပဳႏိုင္ပါတယ္။

2

Live Screen Capture

Android screen capture လုပ္ဖုိ ့အတြက္ home window က device ပံုေအာက္မွာျပဳလုပ္ႏိုင္ျပီး setting ထဲမွာ device model  ကို show/hide လုပ္ႏိုင္ျပီး captured screenshot ေတြကို clipboard မွာသိမ္းႏိုင္သလို ဖိုဒါမွာသိမ္းဖို ့ေရြးခ်ယ္ႏိုင္ပါတယ္။Screenshot folder ကို လည္း ဖြင့္ႏိုင္ပါတယ္။Screen ကို refresh/auto refresh လုပ္ႏိုင္ျပီး full screen ၾကည့္ရွုႏိုင္ပါတယ္။

Ashampoo_Snap_2013.01.08_14h22m07s_002_

File Manager & Backup/Restore

Home window မွာ ပဲ device or sd card ကို ေရြးခ်ယ္ျပီး file manager ကေန သင့္ android ဖုန္း ထဲကဖိုင္ေတြ ကို manage လုပ္ႏိုင္ပါတယ္။ကြန္ျပဴတာနဲ့ ့ device ၾကားမွာ အျပန္အလွန္ ဖုိင္ေတြ ေပးပို ့ႏိုင္ဖို ့ upload , download ကို အသံုးျပဳႏိုင္ပါတယ္။android applications(apk) ဖိုင္ေတြကိုလ ည္း file manager ကေန အင္စေတာလုပ္ႏိိုင္ပါတယ္္။

Ashampoo_Snap_2013.01.08_14h36m59s_003_-nibCCapture-833160ee-37c4-4975-8593-45dc39c2f9a7

Backup/Restore လုပ္ဖုိ ့ home tab က Backup/Restore ကို ႏွိပ္ပါ။contacts, messages, call logs,images,media,applications, app data, ringtones, themes, wallpaper စတာေတြကို backup လုပ္ေပးႏိုင္ျပီး သင္ၾကိဳက္ႏွစ္သက္ရာက္ို ေရြးခ်ယ္ backup လုပ္ႏိုင္ပါတယ္။Restore လုပ္ဖို ့အတြက္ Restore tab ကိုႏွိပ္ပါ။

3

Data Management

Data tab မွာေတာ့ သင့္ android device က contacts,messages,call logs ေတြကို ၾကည့္ရွုႏိုင္ manage လုပ္ႏိုင္ပါတယ္။ဖုန္းတစ္လံုးကေနတစ္လံုးကို contacts ေတြ ကူးခ်င္တဲ့ အခါမ်ိဳးမွာ Import&Export ကို အသံုးျပဳပါ။ Android to Ios,Ios to Android စသျဖင့္ အျပန္အလွန္ contact ေတြ ကူးယူႏိုင္ပါတယ္။ေနာက္ျပီး သင့္ contacts ေတြဆီကို message ပို ့ႏိုင္ပါတယ္။
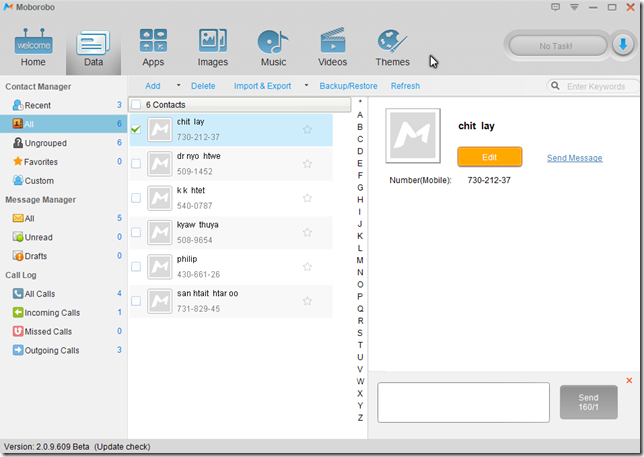
Ashampoo_Snap_2013.01.08_14h46m10s_004_Moborobo

App Management – Install, Delete, Update & Find Apps

Apps tab မွာ ေတာ့ user applications,system applications,applications updater ေတြကို ေတြ ့ျမင္ႏိုင္ျပီး install/uninstall လုပ္ႏိုင္ပါတယ္။ကြန္ျပဴတာက android application(apk) ဖိုင္ေတြကိုလည္း အင္စေတာလုပ္ႏိုင္ပါတယ္။Web Resources ကေနလည္း application ေတြကို download and install လုပ္ႏိုင္ပါတယ္။
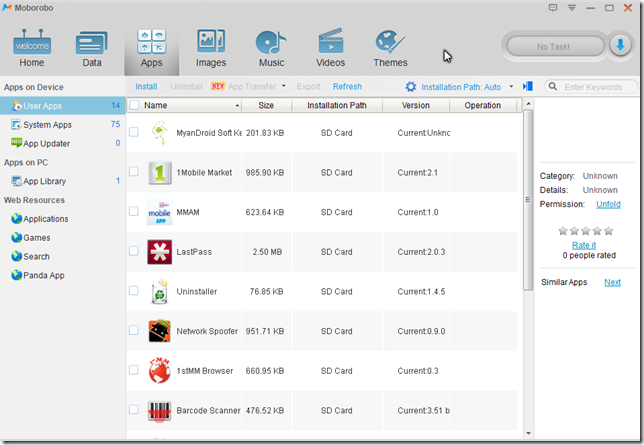
Ashampoo_Snap_2013.01.08_14h59m43s_005_Moborobo

Image,music,video management

Image,music,video tabs ေတြကေန device မွာ ရွိတဲ့ image,music,video ေတြကို ၾကည့္ရွုနားဆင္ႏိုင္ျပီး သင့္ကြန္ျပဴတာနဲ ့ device ၾကားမွာအျပန္အလွန္ image,music,video ေတြကို ကူးယူ ႏိုင္ပါတယ္။Music tab မွာ သင္ၾကိဳက္ႏွစ္သက္ရာ သီခ်င္းေတြကို ringtone အျဖစ္ျပဳလုပ္ႏိုင္ပါတယ္။

Ashampoo_Snap_2013.01.08_15h12m09s_008_Moborobo

Downlaod Moborobo for free @ www.moborobo.com/download/

Monday, January 7, 2013

How To Add Shutdown/Restart/Sleep To The Windows 8 Metro Start Screen

1

Windows 8 မွာ  Shutdown/Restart လုပ္ဖုိ ့အတြက္ Charms Bar(Win + C) ဒါမွမဟုတ္ Setting(Win + I) ကေန တစ္ဆင့္လုပ္ရပါတယ္။အဲဒီအဆင့္ေတြကို လုပ္စရာမလို ဘဲ start screen ကေနပဲ  Shutdown/Restart ကို လွ်င္လွ်င္ျမန္ျမန္ လုပ္ႏိုင္ဖို ့အတြက္ နည္းလမ္းကို ေ၀မွ်ခ်င္ပါတယ္။ဒီလို လုပ္ဖို ့အတြက္ Metro Start Screen ကေန Desktop ကို အရင္သြားရပါမယ္။Desktop မွာ shortcut တစ္ခု ျပဳလုပ္ရပါမယ္။

Desktop ကလြတ္တဲ့ေန ရာမွာ right click ႏွိပ္ျပီး New>Shortcut ကိုႏွိပ္ပါ။Type the location of the item ဆိုတဲ့ box ေပၚလာရင္ ေအာက္က command ရိုက္ထည့္ေပးပါ။Next ႏွိပ္ပါ။

shutdown.exe -s -t 00

1

ေနာက္အဆင့္မွာေတာ့ shortcut အတြက္နာမည္ေပးျပီး Finish ႏွိပ္ပါ။ဒါဆိုရင္ Desktop မွာ shutdown အတြက္ shortcut လုပ္ျပီးပါျပီ။Shortcut icon ကို ေျပာင္းဖို ့အတြက္ Shutdown shortcut ေပၚမွာ right click ႏွိပ္ျပီး properties>shortcut>Chage Icon ကိုႏွိပ္ျပီး ႏွစ္သက္ရာ icon ကို ေျပာင္းပါ။Shutdown shortcut ကို start screen မွာ ထည့္ဖို ့အတြက္  shutdown shortcut ေပၚမွာ right click ႏွိပ္ျပီး copy ႏွိပ္ပါ။

2

ေအာက္က directory ေအာက္မွာ paste လုပ္ပါ။

C:\ProgramData\Microsoft\Windows\Start Menu\Programs

C:\ ေအာက္က ProgramData က hidden directory ျဖစ္တဲ့အတြက္ View tab က Hidden item ဆိုတဲ့ check box မွာ အမွန္ျခစ္ေပးမွသာ ProgramData ကို ျမင္ေတြ ့ရမွာပါ။

3

Paste လုပ္ျပီးရင္ေတာ့ start screen မွာ shutdown tile ကို ျမင္ေတြ ့ႏိုင္ပါျပီ။

4

Restart,hibernate,sleep စတာေတြကို start screen မွာ ထည့္သြင္းဖို ့အတြက္  ေအာက္က command ေတြကို အသံုးျပဳျပီး desktop မွာ shortcut ျပဳလုပ္ျပီး အေပၚကအဆင့္ေတြ အတုိင္း ဆက္လုပ္ပါ။

Restart Computer: shutdown.exe -r -t 00

Hibernate Computer: rundll32.exe powrProf.dll,SetSuspendState

Sleep Computer: rundll32.exe powrprof.dll,SetSuspendState 0,1,0